Manage Guardrails
Use this guide when you need to create, review, or maintain reusable guardrail templates for Pharaoh sessions and local-assistant policy.
Self-healing escalations may show a policy snapshot or grant context during review, but the approve/reject workflow lives in the self-healing escalation review flow. Use this guide for maintaining reusable templates; use the self-healing guide when you are reviewing one escalation decision.
Before You Start
Section titled “Before You Start”- You need an organization admin role.
- You should know whether you are creating a brand-new template or editing an existing baseline.
- If another workflow depends on the template, decide whether you should edit the existing record or clone it first.
Before editing, identify the operational job the template protects: diagnostic investigation, routine remediation, emergency recovery, or local-assistant policy. That decision should drive how permissive the rules are.
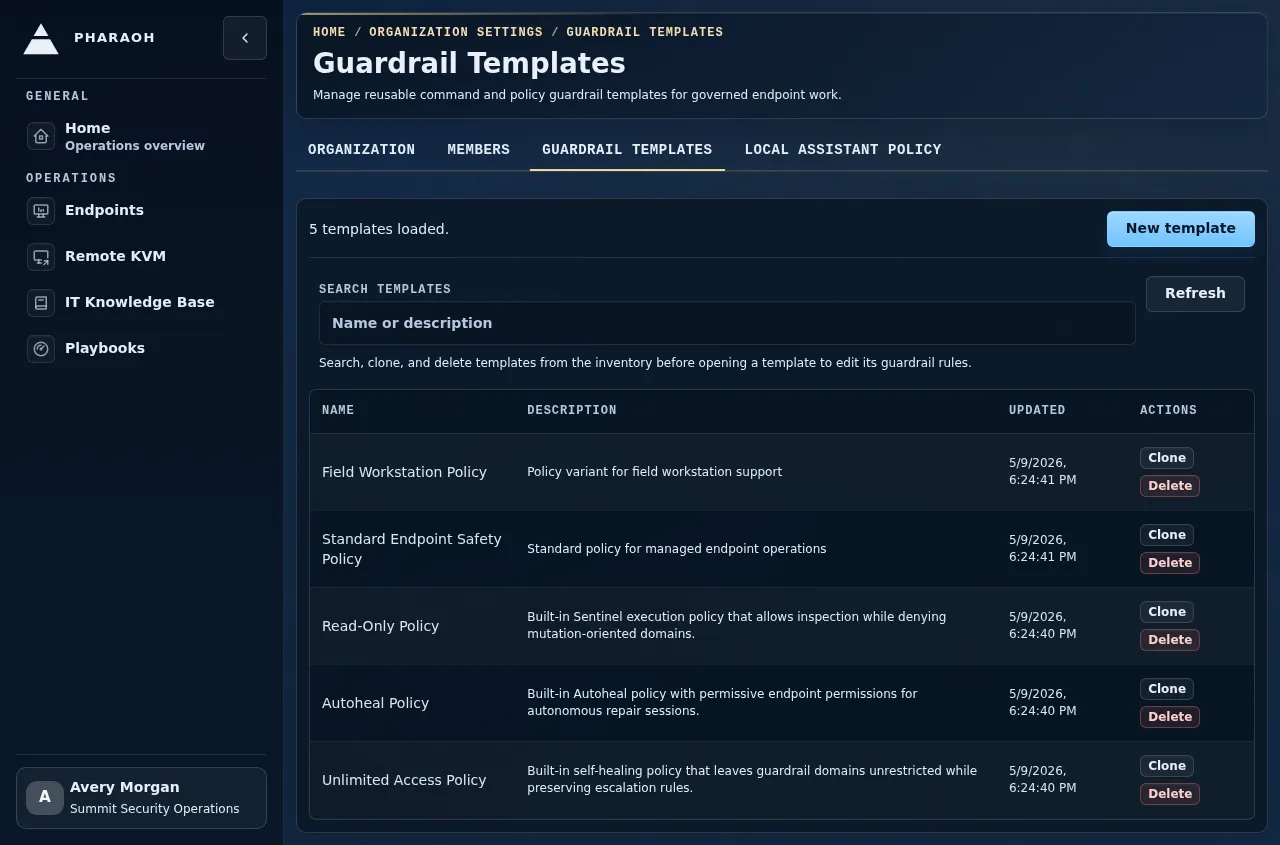
Step 1: Open The Guardrails Inventory
Section titled “Step 1: Open The Guardrails Inventory”Open Guardrails from the Security navigation group.
The main page is the template inventory. What you should expect:
- a
Search templatesfield - a
Refreshaction - a
New templateaction - a template table when templates already exist
- row navigation into a dedicated
Template editorpage
If no templates exist yet, Pharaoh shows Create your first guardrail template instead of an empty table.
Start here even when you already know which template you need. The inventory tells you whether the right record already exists, whether another admin recently changed it, and which maintenance actions are available.
Step 2: Decide Create, Edit, Clone, Or Delete
Section titled “Step 2: Decide Create, Edit, Clone, Or Delete”Use this decision point before opening the editor:
- Create a new template when the workflow needs a clean policy baseline.
- Edit an existing template when the same workflow should keep using the updated behavior.
- Clone a template when you need a close variant but the original must remain available.
- Delete only when operators should no longer be able to choose the template.
If you are unsure, open the template and review its description before changing it. A short review prevents one broad template from absorbing unrelated endpoint jobs.
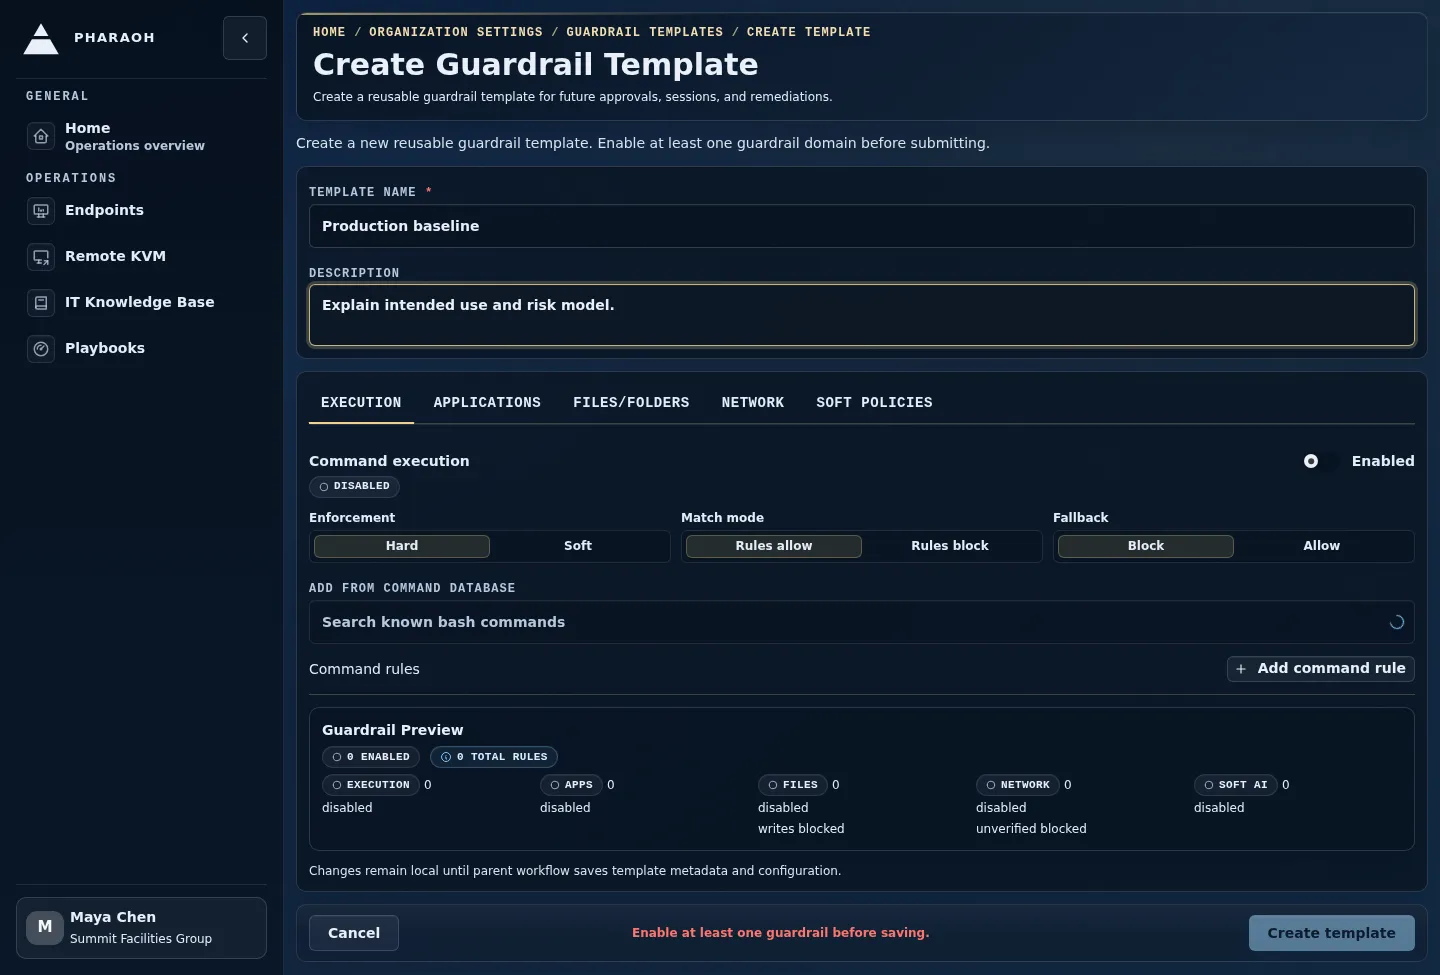
Step 3: Create A New Template
Section titled “Step 3: Create A New Template”If you are starting from scratch:
- Select
New template. - Enter a clear
Template name. - Add a description that names the workflow, team, or endpoint class the template protects.
- Configure the initial guardrail set.
- Resolve any inline validation.
- Save the template and return to the inventory.
Use this path when you need a clean baseline and do not want to inherit old rules by mistake.
Create a separate template when a workflow needs a different risk posture, audit audience, or approval expectation. Do not overload one broad template for unrelated endpoint jobs.
Step 4: Find And Select An Existing Template
Section titled “Step 4: Find And Select An Existing Template”When templates already exist:
- Use
Search templatesto narrow by name or description. - Compare the description and last visible state before opening a row.
- Select the row you want to inspect or edit.
The selected template opens on its own editor page so the inventory stays focused on search, clone, delete, and create actions.
If search does not return the template you expected, use Refresh before creating a replacement. Another admin may have renamed, cloned, or deleted the record.
Step 5: Update The Template
Section titled “Step 5: Update The Template”Inside the template editor, Pharaoh keeps template metadata and the guardrail draft together.
What you can change:
Template nameDescription- the domain-specific guardrail configuration inside the editor
Use Save template only after the editor shows the exact draft you want. Client-side validation stays inline, so whitelist or blacklist modes that need explicit rules will surface errors before the save completes.
If Save template is disabled or validation appears inline, resolve the missing rule details before leaving the page. A template that cannot save cannot be selected reliably for new endpoint sessions.
Before saving an edit, check whether the change should affect every future workflow that uses this template. If the answer is no, cancel the edit and clone instead.
Step 6: Clone Safely
Section titled “Step 6: Clone Safely”Use Clone when you want a distinct starting point for a new workflow.
- Return to the inventory.
- Select
Cloneon the source template row. - In
Clone guardrail template, enter aNew template name. - Save the clone.
- Open the cloned record and adjust the description or rules for the new workflow.
Prefer Clone over direct edits when active runbooks, support teams, or local-assistant policies still depend on the current template behavior.
Step 7: Delete Only After Confirmation
Section titled “Step 7: Delete Only After Confirmation”Use Delete only when you are certain the template should be removed.
- Confirm operators no longer need to start sessions with that template.
- Select
Deleteon the template row. - In
Delete guardrail template, type the exact template name inConfirmation. - Complete the delete action only after the destructive action becomes enabled.
If you cannot confidently type the exact template name, stop and re-check the inventory. Deleting the wrong reusable template can remove a known-safe starting point for future sessions.
What Success Looks Like
Section titled “What Success Looks Like”You are done when all of the following are true:
- the correct template appears in the inventory
- opening the template row shows the expected draft in the dedicated editor
- the description and rule changes persist after refresh
- any clone has a distinct name and separate record
- any intended delete is confirmed and removed from the inventory